Why Make Your Own Vegan Coconut Yogurt? The Instant Pot Advantage
The world of dairy-free alternatives has exploded, and vegan yogurt is a staple for many. However, a quick glance at the supermarket shelves reveals a common challenge: store-bought vegan coconut yogurt can be surprisingly expensive and often packed with an array of thickeners, gums, and added sugars. This can leave health-conscious consumers wondering if they're truly getting a clean, beneficial product. This is precisely why learning how to make vegan coconut milk yogurt at home is a game-changer.
Making your own provides unparalleled control over ingredients, ensuring your yogurt is free from undesirable additives. Plus, it's significantly more cost-effective in the long run. The Instant Pot, a modern kitchen marvel, simplifies this process dramatically. While traditional yogurt making can be a bit finicky with temperature control, the Instant Pot's dedicated "Yogurt" function creates the perfect environment for fermentation. More importantly, it offers a clever workaround for proper pasteurization, a crucial step we'll delve into shortly.
Embracing homemade vegan coconut yogurt means enjoying a probiotic-rich, creamy treat that's not only delicious but also aligns with your health and dietary goals. It’s an easy, affordable, and incredibly satisfying way to take control of your kitchen.
The Secret to Thick, Creamy Vegan Coconut Yogurt: Beyond Basic Fermentation
One of the most common questions when venturing into homemade dairy-free yogurt is, "How do I get it thick?" Many store-bought vegan yogurts achieve their consistency through an assortment of starches and gums, which can sometimes result in a less-than-ideal mouthfeel or even a slightly gummy texture. While these can work, our goal is to achieve a naturally thick, Greek-style yogurt without relying heavily on such additives.
Initially, some might consider using thickeners like tapioca starch. My own experiments revealed that while tapioca starch *can* thicken, it often requires a substantial amount (e.g., 1/4 cup for two cans of coconut milk) to achieve significant density. The resulting texture, however, tended to mimic those overly-processed, store-bought varieties, feeling a bit "off" and sometimes even a little slimy. It detracts from the pure, creamy experience we're aiming for.
Another approach involves using only coconut cream, the thick, solid part that separates in a chilled can of full-fat coconut milk. While this can yield a very thick product, the flavor profile often becomes excessively rich and fatty. While some might enjoy this decadent taste, it can overpower the subtle tang of yogurt and feel a bit too heavy for everyday consumption. Ultimately, the best results for a truly thick, yet balanced, Greek-style vegan coconut yogurt come from leveraging the fat content of full-fat coconut milk itself, combined with the magic of chilling. For an even deeper dive into achieving this specific texture, explore our guide on Achieve Greek-Style Vegan Coconut Yogurt in Your Instant Pot.
The key insight here is that your yogurt will appear quite thin and runny immediately after the fermentation cycle in the Instant Pot. Do not despair! The remarkable transformation into a thick, luxurious consistency happens during the refrigeration phase. As the fat in the full-fat coconut milk chills, it solidifies and creates that coveted spoonable texture, similar to a traditional Greek yogurt. This natural process eliminates the need for excessive thickeners, giving you a purer, more satisfying product.
Mastering the Instant Pot Saute Secret: Pasteurization for Perfection
Achieving truly great homemade vegan yogurt hinges on one often-overlooked step: proper pasteurization. This critical process involves heating your coconut milk to a specific temperature to eliminate any undesirable bacteria that might compete with your beneficial yogurt cultures. Without proper pasteurization, you risk your yogurt not setting, developing off-flavors, or even growing harmful microbes. The target temperature for effective pasteurization is typically 180°F (82°C) or higher.
Many Instant Pot users might instinctively turn to the "Boil" function, assuming it's designed for this purpose. However, a common frustration, which I've personally experienced, is that the Instant Pot's "Boil" function often falls short. It might struggle to bring the coconut milk to a true rolling boil and often won't reach the crucial 180°F threshold, sometimes topping out around 150°F (65°C). This means your milk isn't sufficiently pasteurized, leaving it vulnerable to contamination.
Herein lies the Easy Instant Pot Vegan Coconut Yogurt: Thick & Additive-Free secret: the "Saute" function. This versatile setting is incredibly effective for rapidly heating liquids. By using the "Saute" function, you can quickly bring your coconut milk to a vigorous rolling boil within minutes, easily surpassing the 180°F mark. If you don't have a thermometer handy, reaching a strong, rolling boil is a reliable visual indicator that you've achieved the necessary pasteurization temperature.
Beyond heating, *sanitization* is equally crucial. Ensure all your equipment—the Instant Pot liner, whisk, and any utensils that will touch the milk—are scrupulously clean. A dishwasher with a sanitize cycle is ideal. Otherwise, sterilizing with boiling water for a few minutes will do the trick. A sterile environment prevents foreign bacteria from interfering with your yogurt culture, paving the way for a successful, delicious batch of homemade vegan coconut milk yogurt.
Step-by-Step Guide: How to Make Vegan Coconut Milk Yogurt in Your Instant Pot
Ready to master how to make vegan coconut milk yogurt that's thick, creamy, and free of additives? Follow this straightforward process, incorporating the Instant Pot Saute secret for optimal results.
What You'll Need:
- 2 (13.5-ounce) cans full-fat coconut milk (ensure it's just coconut milk, no guar gum or other thickeners if possible, though a small amount is often unavoidable)
- 2-3 probiotic capsules (at least 25 billion CFUs, ensure they are vegan and contain active cultures like Lactobacillus and Bifidobacterium strains) OR 1/4 cup store-bought plain vegan coconut yogurt with live active cultures (as a starter)
- Instant Pot
- Whisk
- Meat thermometer (optional, but highly recommended)
- Clean, airtight glass jars for storage
Instructions:
- Sanitize Everything: Begin by thoroughly sanitizing your Instant Pot inner pot and whisk. You can run them through a dishwasher on a sanitize cycle, or carefully boil them in water for 5-10 minutes. This step is crucial to prevent contamination and ensure your beneficial cultures thrive.
- Pasteurize the Coconut Milk: Pour both cans of full-fat coconut milk into the sanitized Instant Pot liner. Press the "Saute" button and set it to "Normal" or "More." Whisk continuously to prevent scorching. Watch closely; once the milk reaches a rolling boil, signifying it has surpassed 180°F (82°C), turn off the Instant Pot. If using a thermometer, ensure it reads at least 180°F.
- Cool Down: Allow the coconut milk to cool down significantly. This is vital because high heat will kill your probiotic cultures. The ideal temperature for adding cultures is between 105-115°F (40-46°C). You can let it cool naturally for an hour or so, or speed up the process by placing the Instant Pot liner in an ice bath. Test the temperature with a thermometer, or if you're experienced, a clean finger should feel warm but not hot (like a baby's bath).
- Add the Starter Culture: Once cooled to the correct temperature, open your probiotic capsules and sprinkle the powder directly into the coconut milk. Whisk thoroughly until fully dissolved. If using a yogurt starter, add it now and whisk well.
- Ferment: Place the lid on your Instant Pot, ensuring the vent is sealed. Press the "Yogurt" button. The default time is usually 8 hours, which is a good starting point. For a tangier, thicker yogurt, you can increase the fermentation time up to 12-16 hours. The longer it ferments, the more pronounced the tang will be.
- Chill and Thicken: Once the fermentation cycle is complete, carefully remove the lid. The yogurt will likely still appear quite thin and runny. This is normal! Give it a gentle stir, then transfer the contents to your clean, airtight glass jars. Place the jars in the refrigerator and chill for at least 8 hours, or preferably overnight. As it chills, the fat in the coconut milk will solidify, transforming your thin liquid into beautifully thick, spoonable vegan coconut yogurt.
Tips for Success:
- Full-Fat is Key: Always use full-fat canned coconut milk for the thickest results. Light coconut milk will yield a very thin yogurt.
- Probiotics Matter: Ensure your probiotic capsules are fresh, potent, and contain strains known for yogurt making.
- Don't Rush the Chill: Patience is crucial for the thickening process. Don't judge your yogurt's final texture until it's been thoroughly chilled.
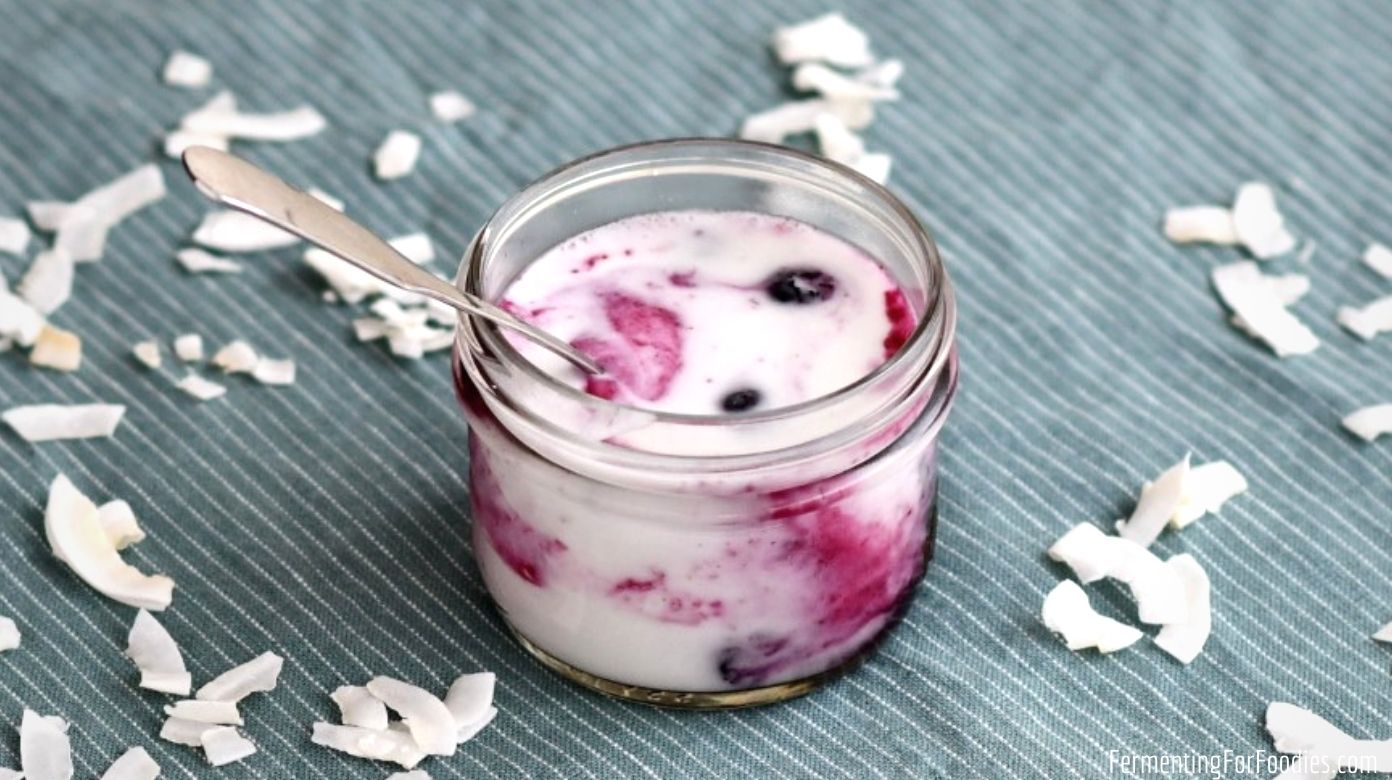
- Flavor Variations: Once chilled, sweeten with maple syrup, agave, or stevia. Add vanilla extract, fresh fruit, or blend with berries for a flavored yogurt.
Conclusion
Embarking on the journey of homemade vegan coconut yogurt is incredibly rewarding. You not only save money but gain complete control over the ingredients, ensuring your family enjoys a truly wholesome, additive-free product. By leveraging the Instant Pot's "Saute" function for proper pasteurization and understanding that the true thickening magic happens during chilling, you can consistently achieve a thick, creamy, Greek-style vegan coconut yogurt that rivals—and often surpasses—store-bought options. So, ditch the expensive, additive-laden alternatives and discover the simple pleasure and health benefits of making your own. It's an easy, empowering, and delicious addition to any plant-based kitchen.
